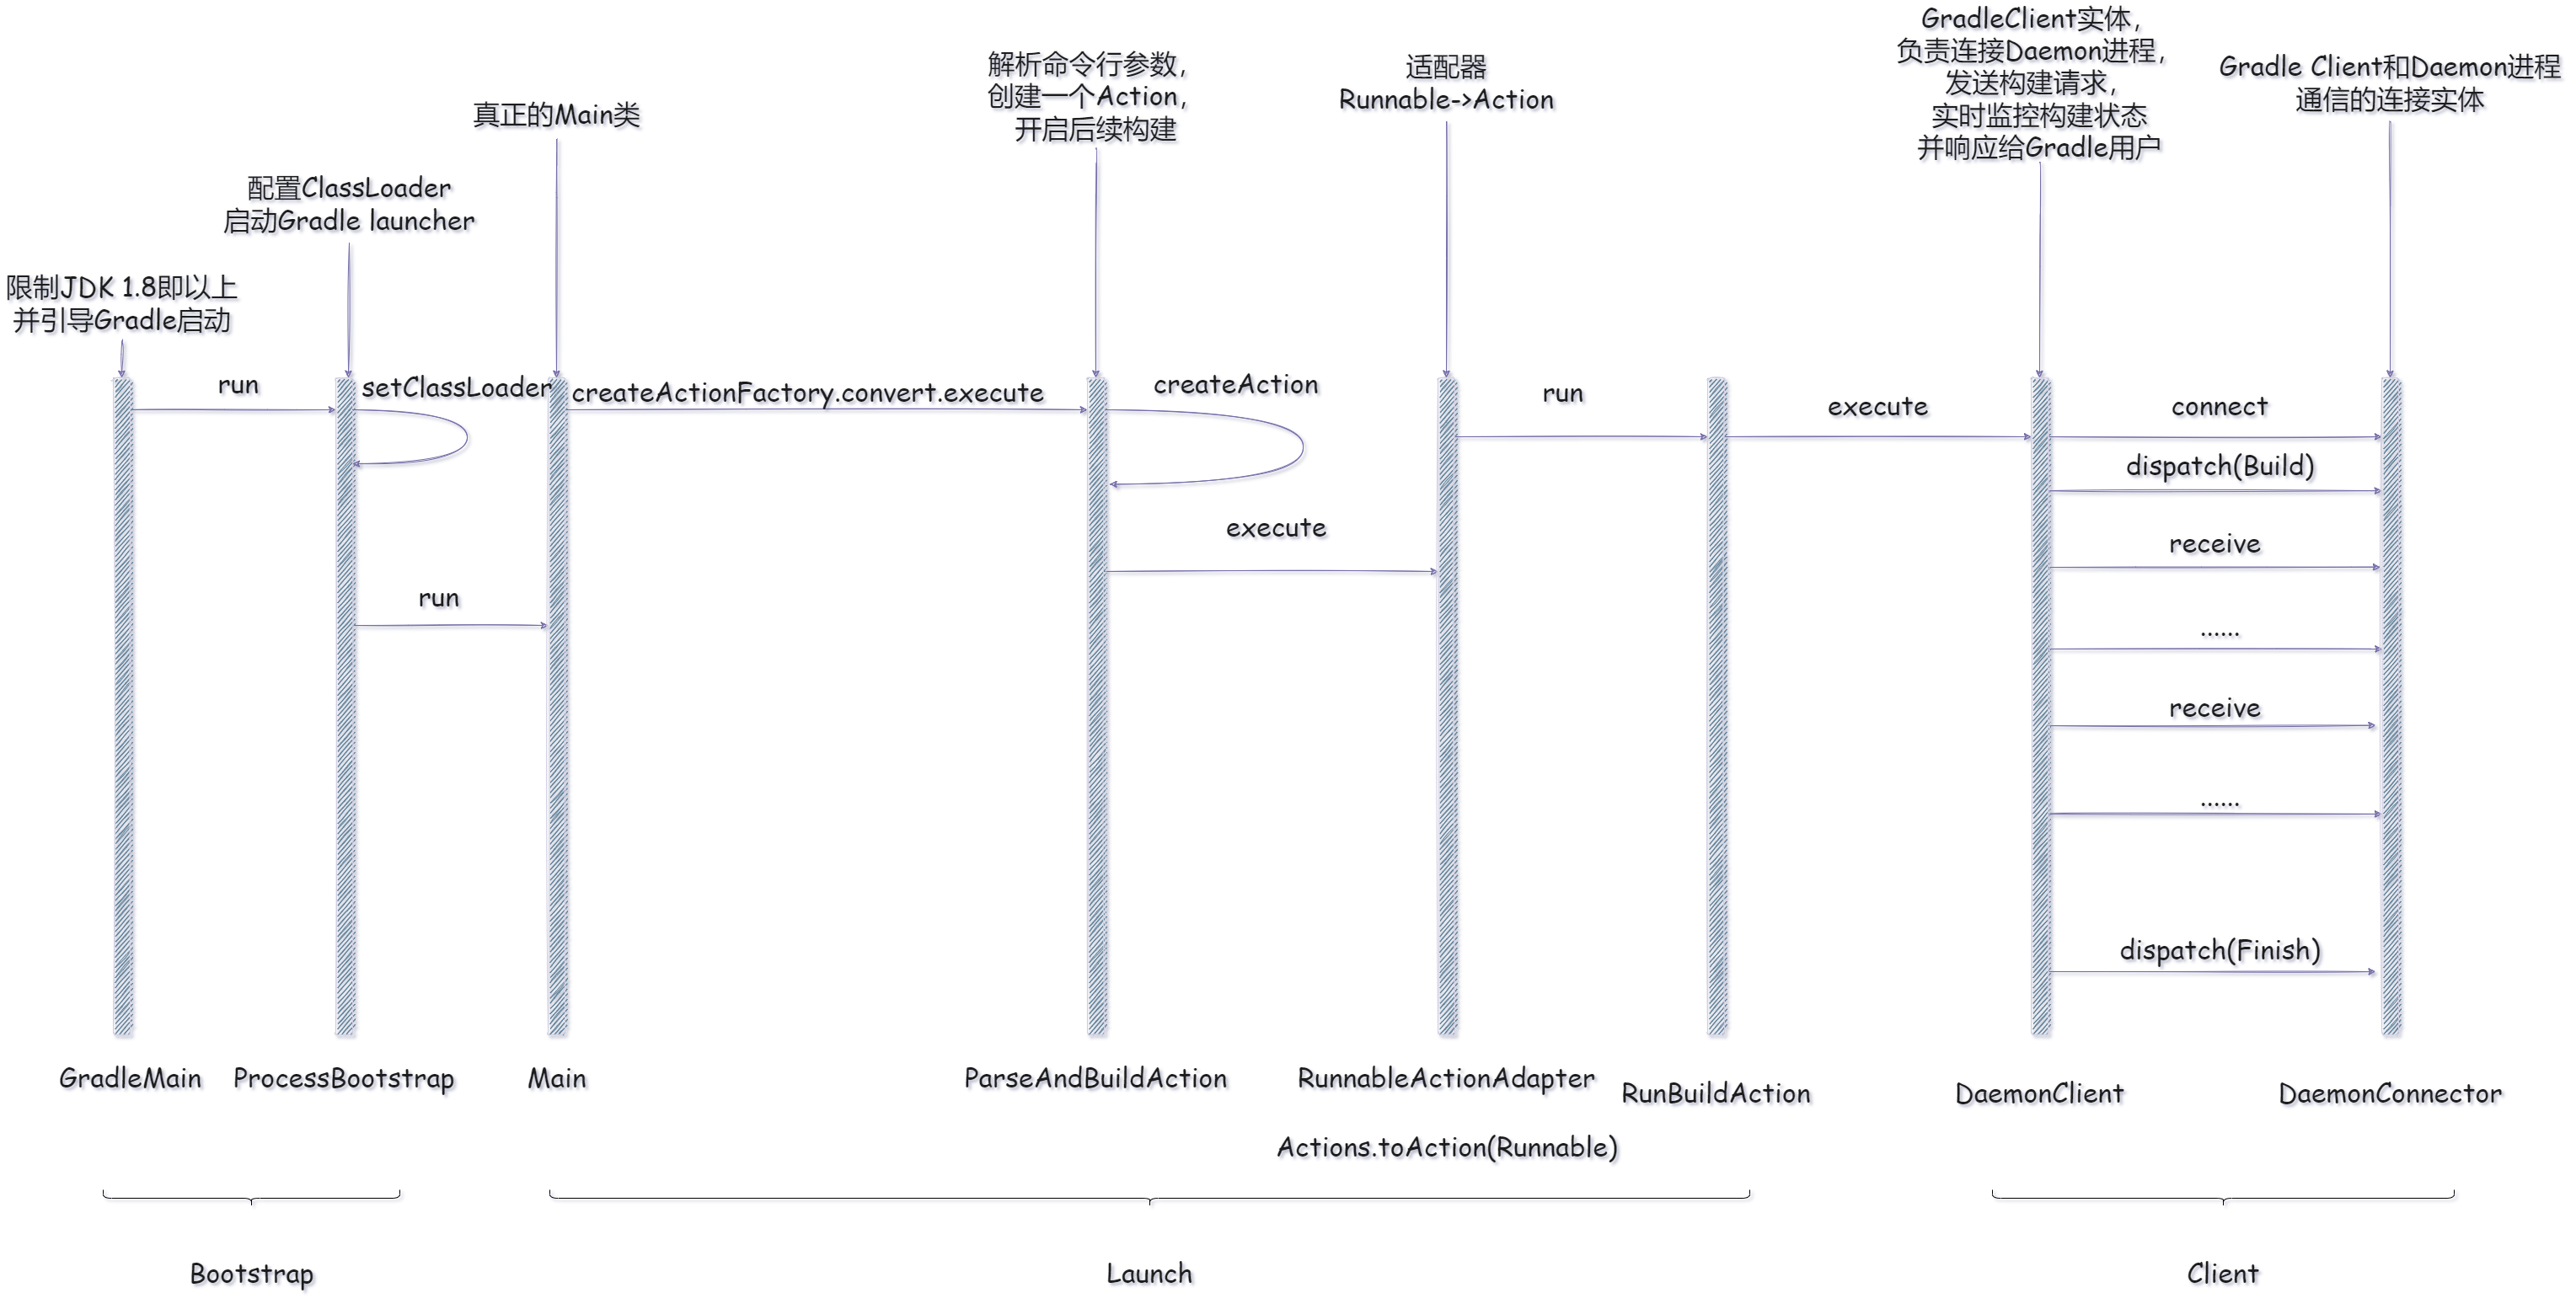
Gradle启动之Client

在本文以前,我们分析了

  • gradle批处理
  • gradle-wrapper

接下来我们需要分析

  • Gradle Client的启动过程

Pre

基本概述

  • Gradle是C/S架构的一个java 程序
  • gradlew实际是用来启动gradle-client进程,
  • 接着client进程会尝试连接后台的守护进程也即是gradle daemon,然后通过socket进行通信。

准备

即进行源代码调试方面相关的环境配置

Gradle既然是一个纯Java程序那么我们肯定是可以调试的。

参考自idea官方文档——remote debug

创建Remote Debug Configuration

Note:

在gradle源码工程创建,方便到时候直接连接。

image-20230214160307320

保持默认配置

image-20230214160522519

复制Command line arguments for remote JVM

1
-agentlib:jdwp=transport=dt_socket,server=y,suspend=n,address=*:5005
  • agentlib: 指定java agent,

    远程调试的采用的是jdwp协议,java debug wire protocol,jdk内置

  • transport

    指定通信类型(socket/shared memory)

  • server

    当前运行的是否服务端

  • suspend

    运行时是否等待接入

  • address

    监听地址

粘贴放入gradle批处理文件

Note:

  1. 如果是mac或者linux系统粘贴到gradlew文件,如果是window系统粘贴到gradlew.bat
  2. 粘贴的内容需要进行细微变动,我们需要debug过程中debug server挂起等待接入,即suspend=y
1
DEFAULT_JVM_OPTS="-Xmx64m" "-Xms64m" "-agentlib:jdwp=transport=dt_socket,server=y,suspend=y,address=*:5005"

image-20230214161426858

完成

这样我们直接运行这个工程,在gradle源代码上打断点以后就能进行调试分析了。

开始分析

Notes:

再次提示需要两个工程

  • 一个demo工程用于启动remote debug server
  • 一个gradle源代码工程作为remote debug client用于调试

启动gradle

在进行Pre准备阶段的配置以后,打开demo工程,直接在cmd上输入

1
./gradlew build 

项目停住了,等待client接入调试。

image-20230214162209437

在Gradle源代码中打上断点

image-20230214164103443

点击debug

image-20230214164120520

流程分析

GradleMain

1
2
3
4
5
6
7
8
9
10
11
12
13
14
15
public class GradleMain {
public static void main(String[] args) throws Exception {
String javaVersion = System.getProperty("java.specification.version");
//判断java版本(什么年代了还1.6,1.7)
if (javaVersion.equals("1.6") || javaVersion.equals("1.7")) {
String gradleVersion = GradleVersionNumberLoader.loadGradleVersionNumber();
System.err.printf("%s %s requires Java 1.8 or later to run. You are currently using Java %s.%n", "Gradle", gradleVersion, javaVersion);
System.exit(1);
}
//转移转移执行流
Class<?> mainClass = Class.forName("org.gradle.launcher.bootstrap.ProcessBootstrap");
Method mainMethod = mainClass.getMethod("run", String.class, String[].class);
mainMethod.invoke(null, "org.gradle.launcher.Main", args);
}
}

ProcessBootstrap

所做不多,配置ClassLoader,然后设置为Thread的contextClassLoader,

1
2
3
4
5
6
7
8
9
10
11
12
13
14
15
16
17
18
19
20
21
22
23
24
25
26
27
28
29
30
31
32
33
34
35
36
37
38
public class ProcessBootstrap {
/**
* Sets up the ClassLoader structure for the given class, creates an instance and invokes {@link EntryPoint#run(String[])} on it.
*/
public static void run(String mainClassName, String[] args) {
try {
runNoExit(mainClassName, args);
System.exit(0);
} catch (Throwable throwable) {
throwable.printStackTrace();
System.exit(1);
}
}

private static void runNoExit(String mainClassName, String[] args) throws Exception { /* 配置ClassLoader */
ClassPathRegistry classPathRegistry = new DefaultClassPathRegistry(new DefaultClassPathProvider(new DefaultModuleRegistry(CurrentGradleInstallation.get())));
ClassLoaderFactory classLoaderFactory = new DefaultClassLoaderFactory();
ClassPath antClasspath = classPathRegistry.getClassPath("ANT");
ClassPath runtimeClasspath = classPathRegistry.getClassPath("GRADLE_RUNTIME");
ClassLoader antClassLoader = classLoaderFactory.createIsolatedClassLoader("ant-loader", antClasspath);
ClassLoader runtimeClassLoader = new VisitableURLClassLoader("ant-and-gradle-loader", antClassLoader, runtimeClasspath);

ClassLoader oldClassLoader = Thread.currentThread().getContextClassLoader();
Thread.currentThread().setContextClassLoader(runtimeClassLoader);

try {
Class<?> mainClass = runtimeClassLoader.loadClass(mainClassName);
Object entryPoint = mainClass.getConstructor().newInstance();
Method mainMethod = mainClass.getMethod("run", String[].class);
mainMethod.invoke(entryPoint, new Object[]{args});
} finally {
Thread.currentThread().setContextClassLoader(oldClassLoader);

ClassLoaderUtils.tryClose(runtimeClassLoader);
ClassLoaderUtils.tryClose(antClassLoader);
}
}
}

ClassLoader 配置

为什么要配置ClassLoader?我们可以先看看Gradle内置的jar包

据统计有237个jar包

所以答案呼之欲出,就是jar包多了所以需要配置好ClassLoader,不然一部留神就ClassNotFound了。

image-20230214181106123

image-20230214181121435

GradleInstallation

一个描述gradle安装等信息的bean类

1
2
3
4
5
6
7
8
9
10
11
12
13
14
15
16
17
18
19
20
21
22
23
24
25
26
27
28
29
30
31
32
33
34
35
36
37
38
39
40
41
42
43
44
45
46
public class GradleInstallation {

public static final FileFilter DIRECTORY_FILTER = new FileFilter() {
@Override
public boolean accept(File pathname) {
return pathname.isDirectory();
}
};

private final File dir;
private final List<File> libDirs;

public GradleInstallation(File dir) {
this.dir = dir;
this.libDirs = Collections.unmodifiableList(findLibDirs(dir));
}
//获得gradle安装路径
public File getGradleHome() {
return dir;
}
//返回lib路径下,所有的文件夹
public List<File> getLibDirs() {
return libDirs;
}
//gradle的源文件
public File getSrcDir() {
return dir.toPath().resolve("src").toFile();
}
//寻找到lib下的所有文件夹
private static List<File> findLibDirs(File dir) {
List<File> libDirAndSubdirs = new ArrayList<File>();
collectWithSubdirectories(new File(dir, "lib"), libDirAndSubdirs);
return libDirAndSubdirs;
}

private static void collectWithSubdirectories(File root, Collection<File> collection) {
collection.add(root);
File[] subDirs = root.listFiles(DIRECTORY_FILTER);
if (subDirs != null) {
for (File subdirectory : subDirs) {
collectWithSubdirectories(subdirectory, collection);
}
}
}

}
ClassPath

如果看过ClassLoader源码就知道,ClassLoader其实是URL的包装,指令执行过程中缺Class文件了,就通过loadClass去指定的URL去寻找Class文件

ClassPath即是对URL的更上层封装。

1
2
3
4
5
6
7
8
9
10
11
12
13
14
15
16
17
18
19
20
public interface ClassPath {

ClassPath EMPTY = new DefaultClassPath();

boolean isEmpty();

List<URI> getAsURIs();

List<File> getAsFiles();

List<URL> getAsURLs();

URL[] getAsURLArray();

ClassPath plus(Collection<File> classPath);

ClassPath plus(ClassPath classPath);

ClassPath removeIf(Spec<? super File> filter);
}
Module

一个Module表示一个模块实体。

他需要包含一个模块的基本信息。

  • 模块自身的classpath
  • 模块间的依赖
1
2
3
4
5
6
7
8
9
10
11
12
13
14
15
16
17
18
19
20
21
22
23
24
25
26
27
28
29
30
31
public interface Module {
/**
* Returns the classpath for the module implementation. This is the classpath of the module itself. Does not include any dependencies.
*/
ClassPath getImplementationClasspath();

/**
* Returns the classpath containing the runtime dependencies of the module. Does not include any other modules.
*/
ClassPath getRuntimeClasspath();

/**
* Returns implementation + runtime.
*/
ClassPath getClasspath();

/**
* Returns the modules required by this module.
*/
Set<Module> getRequiredModules();

/**
* Returns the transitive closure of all modules required by this module, including the module itself.
*/
Set<Module> getAllRequiredModules();

/**
* Returns the implementation + runtime classpath of the transitive closure of all modules required by this module, including the module itself.
*/
ClassPath getAllRequiredModulesClasspath();
}
ModuleRegistry

依据指定的路径,动态寻找模块信息的类。

1
2
3
4
5
6
7
8
9
10
11
12
13
14
15
16
17
18
19
20
21
22
23
24
25
26
27
28
29
public interface ModuleRegistry {
/**
* Locates an external module by name. An external module is one for which there is no meta-data available. Assumed to be packaged as a single jar file, and to have no runtime dependencies.
*
* @return the module. Does not return null.
*/
Module getExternalModule(String name) throws UnknownModuleException;

/**
* Locates a module by name.
*
* @return the module. Does not return null.
*/
Module getModule(String name) throws UnknownModuleException;

/**
* Tries to locate a module by name.
*
* @return the optional module, or {@literal null} if it cannot be found
* @throws UnknownModuleException if the requested module is found but one of its dependencies is not
*/
@Nullable
Module findModule(String name) throws UnknownModuleException;

/**
* Returns the classpath used to search for modules, in addition to default locations in the Gradle distribution (if available). May be empty.
*/
ClassPath getAdditionalClassPath();
}
ClassPathProvider

依据模块name获取模块运行时所需的所有classpath

1
2
3
4
5
6
7
public interface ClassPathProvider {
/**
* Returns the files for the given classpath, if known. Returns null for unknown classpath.
*/
@Nullable
ClassPath findClassPath(String name);
}
ClassLoaderFactory

可以依据不同的需求创建3类ClassLoader

  • getIsolatedSystemClassLoader

    Isolated的父ClassLoader,其实也就是SystemClassLoader.parent

  • createIsolatedClassLoader

    包含指定classpath的ClassLoader

  • createFilteringClassLoader

    可以指定过滤器的ClassLoader,满足过滤器的class将交由parent加载

1
2
3
4
5
6
7
8
9
10
11
12
13
14
15
16
17
18
19
20
public interface ClassLoaderFactory {
/**
* Returns the ClassLoader that will be used as the parent for all isolated ClassLoaders.
*/
ClassLoader getIsolatedSystemClassLoader();

/**
* Creates a ClassLoader implementation which has only the classes from the specified URIs and the Java API visible.
*/
ClassLoader createIsolatedClassLoader(String name, ClassPath classPath);

/**
* Creates a ClassLoader implementation which has, by default, only the classes from the Java API visible, but which can allow access to selected classes from the given parent ClassLoader.
*
* @param parent the parent ClassLoader
* @param spec the filtering spec for the classloader
* @return The ClassLoader
*/
ClassLoader createFilteringClassLoader(ClassLoader parent, FilteringClassLoader.Spec spec);
}
实现分析

也就是生成了一个包含ANT,GRADLE_RUNTIME模块的ClassLoader,然后设置为Thread的ContextClassLoader。

1
2
3
4
5
6
7
8
9
10
11
12
13
14

ClassPathRegistry classPathRegistry = new DefaultClassPathRegistry(
new DefaultClassPathProvider(
new DefaultModuleRegistry(CurrentGradleInstallation.get())
)
);
ClassLoaderFactory classLoaderFactory = new DefaultClassLoaderFactory();
ClassPath antClasspath = classPathRegistry.getClassPath("ANT");
ClassPath runtimeClasspath = classPathRegistry.getClassPath("GRADLE_RUNTIME");
ClassLoader antClassLoader = classLoaderFactory.createIsolatedClassLoader("ant-loader", antClasspath);
ClassLoader runtimeClassLoader = new VisitableURLClassLoader("ant-and-gradle-loader", antClassLoader, runtimeClasspath);

ClassLoader oldClassLoader = Thread.currentThread().getContextClassLoader();
Thread.currentThread().setContextClassLoader(runtimeClassLoader);

不是很直观是吧?

如下是模块对照关系

ANT:

  • ant-*.jar

  • ant-launcher-*.jar

GRADLE:

  • gradle-launcher-*.jar
1
2
3
4
5
6
7
8
9
10
11
12
13
14
15
16
17
18
19
20
21
22
23
24
25
26
27
28
29
30
31
32
33
34
35
36
37
38
39
40
41
42
43
44
45
46
47
48
public ClassPath findClassPath(String name) {
if (name.equals("GRADLE_RUNTIME")) {
return moduleRegistry.getModule("gradle-launcher").getAllRequiredModulesClasspath();
}
if (name.equals("GRADLE_INSTALLATION_BEACON")) {
return moduleRegistry.getModule("gradle-installation-beacon").getImplementationClasspath();
}
if (name.equals("GROOVY-COMPILER")) {
ClassPath classpath = ClassPath.EMPTY;
classpath = classpath.plus(moduleRegistry.getModule("gradle-language-groovy").getImplementationClasspath());
classpath = classpath.plus(moduleRegistry.getExternalModule("groovy").getClasspath());
classpath = classpath.plus(moduleRegistry.getExternalModule("groovy-json").getClasspath());
classpath = classpath.plus(moduleRegistry.getExternalModule("groovy-xml").getClasspath());
classpath = classpath.plus(moduleRegistry.getExternalModule("asm").getClasspath());
classpath = addJavaCompilerModules(classpath);
return classpath;
}
if (name.equals("SCALA-COMPILER")) {
ClassPath classpath = ClassPath.EMPTY;
classpath = classpath.plus(moduleRegistry.getModule("gradle-scala").getImplementationClasspath());
classpath = addJavaCompilerModules(classpath);
return classpath;
}
if (name.equals("JAVA-COMPILER")) {
return addJavaCompilerModules(ClassPath.EMPTY);
}
if (name.equals("DEPENDENCIES-EXTENSION-COMPILER")) {
ClassPath classpath = ClassPath.EMPTY;
classpath = classpath.plus(moduleRegistry.getModule("gradle-base-annotations").getImplementationClasspath());
classpath = classpath.plus(moduleRegistry.getModule("gradle-base-services").getImplementationClasspath());
classpath = classpath.plus(moduleRegistry.getModule("gradle-core-api").getImplementationClasspath());
classpath = classpath.plus(moduleRegistry.getModule("gradle-core").getImplementationClasspath());
classpath = classpath.plus(moduleRegistry.getModule("gradle-dependency-management").getImplementationClasspath());
classpath = classpath.plus(moduleRegistry.getExternalModule("javax.inject").getClasspath());
return classpath;
}
if (name.equals("JAVA-COMPILER-PLUGIN")) {
return addJavaCompilerModules(moduleRegistry.getModule("gradle-java-compiler-plugin").getImplementationClasspath());
}
if (name.equals("ANT")) {
ClassPath classpath = ClassPath.EMPTY;
classpath = classpath.plus(moduleRegistry.getExternalModule("ant").getClasspath());
classpath = classpath.plus(moduleRegistry.getExternalModule("ant-launcher").getClasspath());
return classpath;
}

return null;
}

Main

类全路径org.gradle.launcher.Main

1
2
3
4
5
6
7
8
9
10
11
12
13
14
15
16
17
18
19
public void run(String[] args) {
/* 监听器 */
RecordingExecutionListener listener = new RecordingExecutionListener();
try {
doAction(args, listener); /* 执行调度 */
} catch (Throwable e) {
/* 处理错误 */
createErrorHandler().execute(e);
listener.onFailure(e);
}
/* 停止程序的执行 */
Throwable failure = listener.getFailure();
ExecutionCompleter completer = createCompleter();
if (failure == null) { /* 正常退出 */
completer.complete();
} else { /* 异常退出 */
completer.completeWithFailure(failure);
}
}

分发执行

其中CommandLineActionFactory是一个创造执行逻辑的Factory

1
2
3
4
@Override
protected void doAction(String[] args, ExecutionListener listener) {
createActionFactory().convert(Arrays.asList(args)).execute(listener);
}

CommandLineActionFactory

1
2
3
4
5
6
7
8
9
10
11
12
public CommandLineExecution convert(List<String> args) {
/* 用于logging */
ServiceRegistry loggingServices = createLoggingServices();
/* 配置日志,接受log等级,log类型,error的stackTrace等配置 */
LoggingConfiguration loggingConfiguration = new DefaultLoggingConfiguration();
/* 最为重要的就是这个ParseAndBuildAction */
return new WithLogging(loggingServices,
args,
loggingConfiguration,
new ParseAndBuildAction(loggingServices, args),
new BuildExceptionReporter(loggingServices.get(StyledTextOutputFactory.class), loggingConfiguration, clientMetaData()));
}

WithLogging

BuildOptionBackedConverter

InitialPropertiesConverter

BuildLayoutConverter

LayoutToPropertiesConverter

都是为了对命令行参数进行解析

接着就是一个构建了5层的Action

1
2
3
4
5
6
7
8
9
10
11
12
13
14
15
16
17
18
19
20
21
22
23
24
25
26
27
28
29
30
31
32
33
34
35
36
37
38
39
40
41
42
43
44
45
46
47
48
49
50
51
52
public void execute(ExecutionListener executionListener) {
BuildOptionBackedConverter<WelcomeMessageConfiguration> welcomeMessageConverter = new BuildOptionBackedConverter<>(new WelcomeMessageBuildOptions());
BuildOptionBackedConverter<LoggingConfiguration> loggingBuildOptions = new BuildOptionBackedConverter<>(new LoggingConfigurationBuildOptions());
InitialPropertiesConverter propertiesConverter = new InitialPropertiesConverter();
BuildLayoutConverter buildLayoutConverter = new BuildLayoutConverter();
LayoutToPropertiesConverter layoutToPropertiesConverter = new LayoutToPropertiesConverter(new BuildLayoutFactory());

BuildLayoutResult buildLayout = buildLayoutConverter.defaultValues();

CommandLineParser parser = new CommandLineParser();
propertiesConverter.configure(parser);
buildLayoutConverter.configure(parser);
loggingBuildOptions.configure(parser);

parser.allowUnknownOptions();
parser.allowMixedSubcommandsAndOptions();

WelcomeMessageConfiguration welcomeMessageConfiguration = new WelcomeMessageConfiguration(WelcomeMessageDisplayMode.ONCE);

try {
ParsedCommandLine parsedCommandLine = parser.parse(args);
InitialProperties initialProperties = propertiesConverter.convert(parsedCommandLine);

// Calculate build layout, for loading properties and other logging configuration
buildLayout = buildLayoutConverter.convert(initialProperties, parsedCommandLine, null);

// Read *.properties files
AllProperties properties = layoutToPropertiesConverter.convert(initialProperties, buildLayout);

// Calculate the logging configuration
loggingBuildOptions.convert(parsedCommandLine, properties, loggingConfiguration);

// Get configuration for showing the welcome message
welcomeMessageConverter.convert(parsedCommandLine, properties, welcomeMessageConfiguration);
} catch (CommandLineArgumentException e) {
// Ignore, deal with this problem later
}
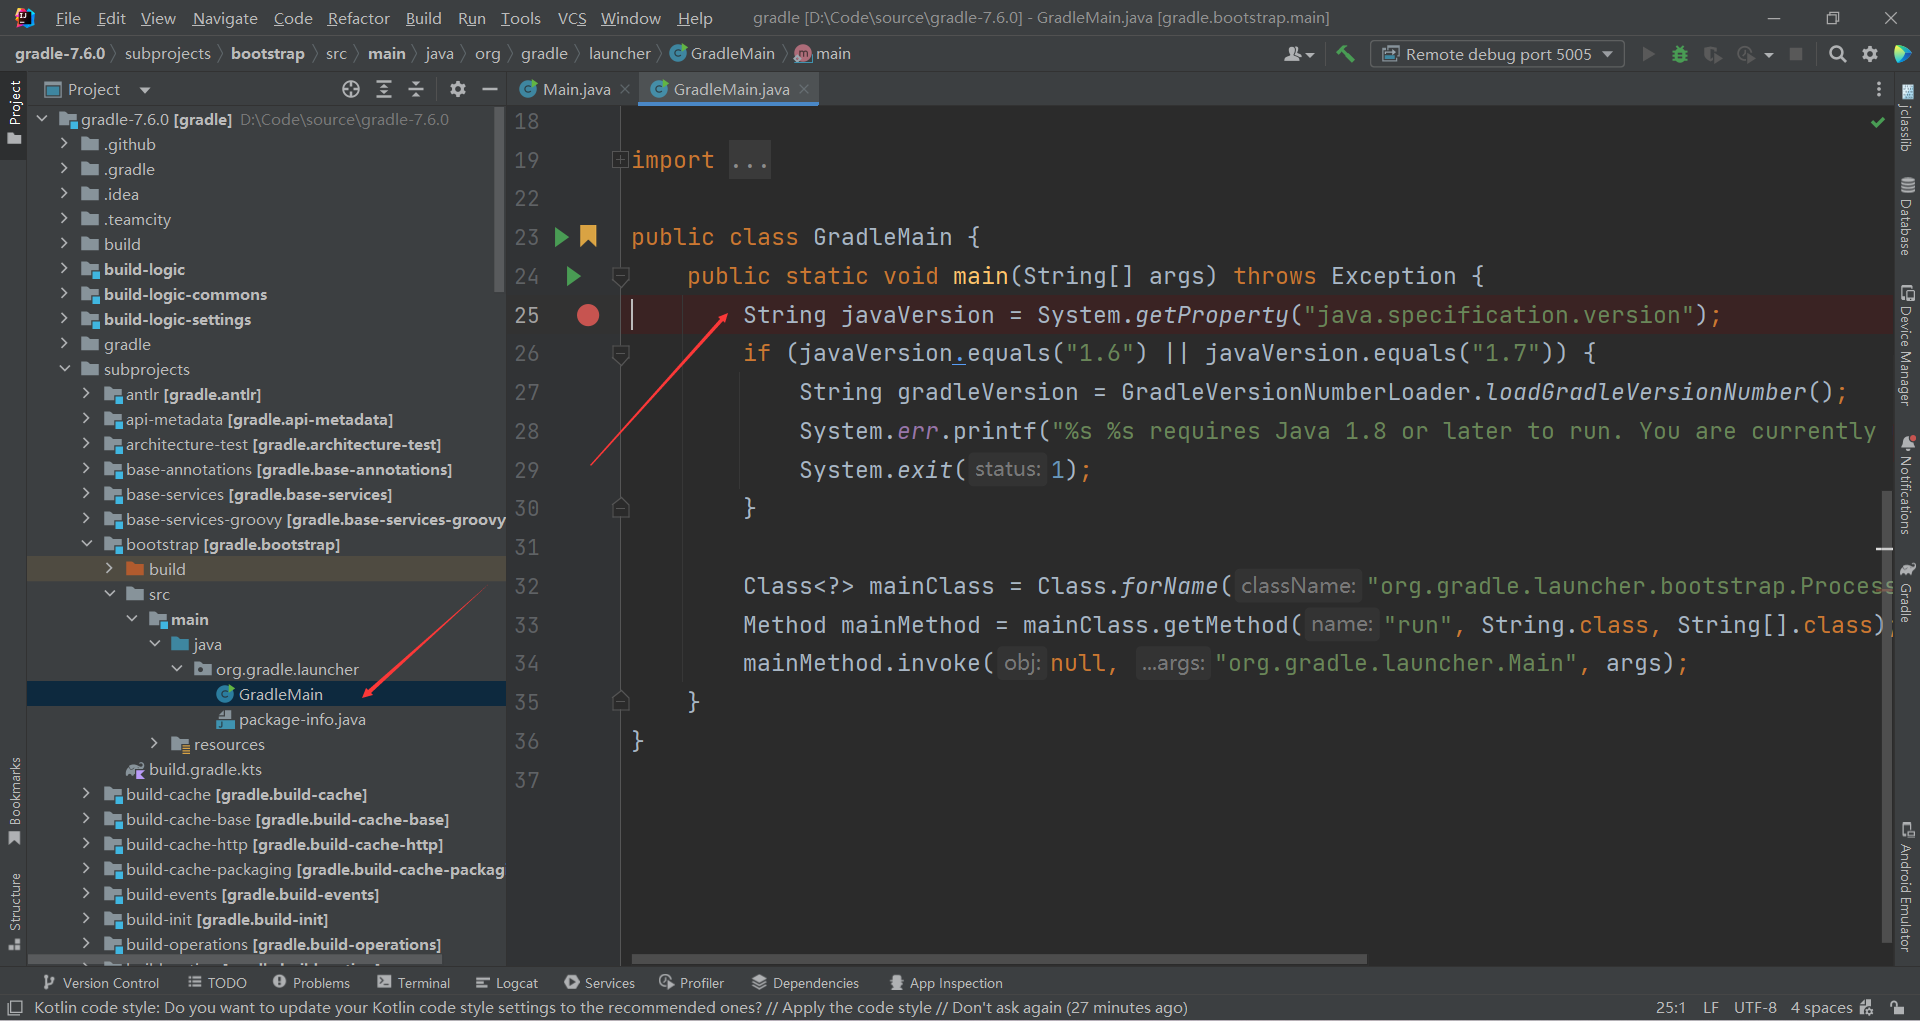
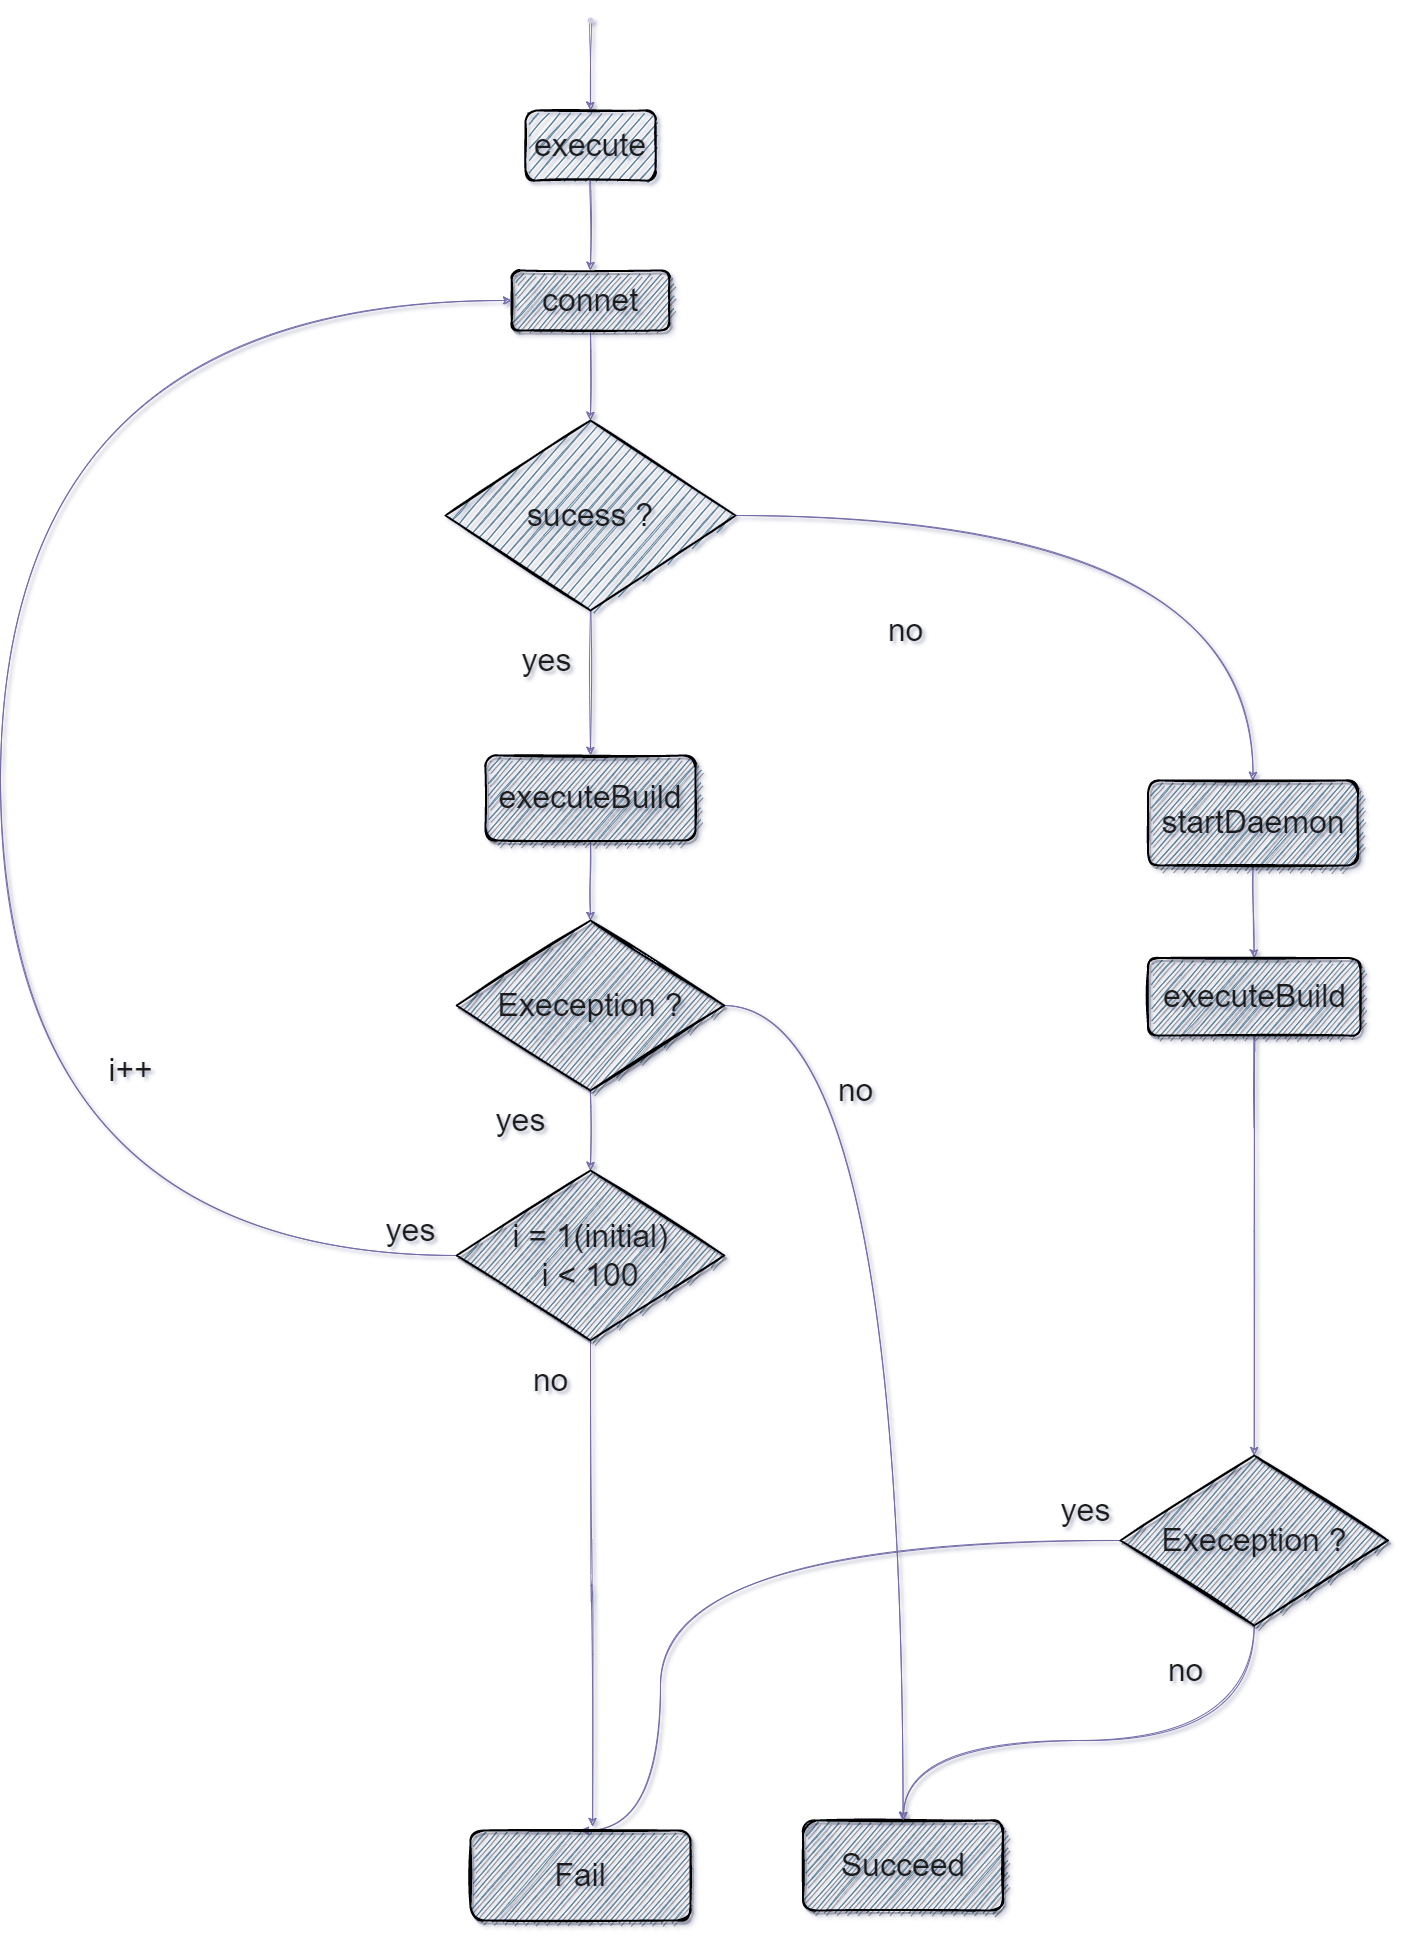
LoggingManagerInternal loggingManager = loggingServices.getFactory(LoggingManagerInternal.class).create();
loggingManager.setLevelInternal(loggingConfiguration.getLogLevel());
loggingManager.start();
try {
Action<ExecutionListener> exceptionReportingAction =
new ExceptionReportingAction(reporter, loggingManager,
new NativeServicesInitializingAction(buildLayout, loggingConfiguration, loggingManager,
new WelcomeMessageAction(buildLayout, welcomeMessageConfiguration,
new DebugLoggerWarningAction(loggingConfiguration, action))));
exceptionReportingAction.execute(executionListener);
} finally {
loggingManager.stop();
}
}

就像这样,你看这”像不像“装饰器模式

当执行action.execute时,从外向内依次执行

各Action功能如下

  • ExceptionReportingAction

    执行过程出错后,进行日志输出

  • NativeServicesInitializingAction

    进行Native服务的注册,Initializes all the services needed for the CLI or the Tooling API。

  • WelcomeMessageAction

    进行参数判断是否输出gradle hello (Welcome to Gradle bla bla bla…)

  • DebugLoggerWarningAction

    gradlew如果传入了–debug会进行debug级别的日志输出,控制台会几行warning消息

    1
    2
    3
    4
    5
    6
    7
    #############################################################################

    WARNING WARNING WARNING WARNING WARNING WARNING WARNING WARNING WARNING

    Debug level logging will leak security sensitive information

    #############################################################################
  • ParseAndBuildAction
    前面几个都没什么用那么这最后一个一定是执行后续的关键类了。

image-20230214205042131

ParseAndBuildAction

继续调度生成Action并执行

1
2
3
4
5
6
7
8
9
10
11
12
13
14
15
16
17
18
19
20
21
22
23
24
25
26
27
28
29
30
31
//构造函数
private ParseAndBuildAction(ServiceRegistry loggingServices, List<String> args) {
this.loggingServices = loggingServices;
this.args = args;

actionCreators = new ArrayList<>();
//添加了两个ActionFactory
actionCreators.add(new BuiltInActionCreator());
actionCreators.add(new ContinuingActionCreator());
}


public void execute(ExecutionListener executionListener) {
// This must be added only during execute, because the actual constructor is called by various tests and this will not succeed if called then
// 在actionFactory集合里添加一个BuildActionsFactory
// actionCreators.add(new BuildActionsFactory(loggingServices));
createBuildActionFactoryActionCreator(loggingServices, actionCreators);
//配置parser用于解析commandLine参数
configureCreators();

Action<? super ExecutionListener> action;
try {
ParsedCommandLine commandLine = parser.parse(args);
//创建action
action = createAction(parser, commandLine);
} catch (CommandLineArgumentException e) {
action = new CommandLineParseFailureAction(parser, e);
}

action.execute(executionListener);
}

BuiltInActionCreator

1
2
3
4
5
6
7
8
9
10
11
public Action<? super ExecutionListener> createAction(CommandLineParser parser, ParsedCommandLine commandLine) {
//-help参数
if (commandLine.hasOption(HELP)) {
return new ShowUsageAction(parser);
}
//-version参数
if (commandLine.hasOption(VERSION)) {
return new ShowVersionAction();
}
return null;
}

ContinuingActionCreator

1
2
3
4
5
6
7
public ContinuingAction<? super ExecutionListener> createAction(CommandLineParser parser, ParsedCommandLine commandLine) {
//-V参数
if (commandLine.hasOption(DefaultCommandLineActionFactory.VERSION_CONTINUE)) {
return (ContinuingAction<ExecutionListener>) executionListener -> new ShowVersionAction().execute(executionListener);
}
return null;
}

根据daemon进程的不同状态,构造不同的Action

1
2
3
4
5
6
7
8
9
10
11
12
13
14
15
16
17
18
19
20
21
22
23
24
25
26
27
28
29
30
31
32
33
34
public Action<? super ExecutionListener> createAction(CommandLineParser parser, ParsedCommandLine commandLine) {
Parameters parameters = parametersConverter.convert(commandLine, null);

parameters.getDaemonParameters().applyDefaultsFor(jvmVersionDetector.getJavaVersion(parameters.getDaemonParameters().getEffectiveJvm()));
//如果参数中指定要stop deamon
//gradle --stop
if (parameters.getDaemonParameters().isStop()) {
return Actions.toAction(stopAllDaemons(parameters.getDaemonParameters()));
}
//如果是查看deamon状态的参数
//即gradle --status参数
if (parameters.getDaemonParameters().isStatus()) {
return Actions.toAction(showDaemonStatus(parameters.getDaemonParameters()));
}
//如果是前台daemon
//gradle --foreground
if (parameters.getDaemonParameters().isForeground()) {
DaemonParameters daemonParameters = parameters.getDaemonParameters();
ForegroundDaemonConfiguration conf = new ForegroundDaemonConfiguration(
UUID.randomUUID().toString(), daemonParameters.getBaseDir(), daemonParameters.getIdleTimeout(), daemonParameters.getPeriodicCheckInterval(), fileCollectionFactory);
return Actions.toAction(new ForegroundDaemonAction(loggingServices, conf));
}
//如果是开启daemon的参数
//gradle <task> --daemon(gradle 3.0默认会添加上)
if (parameters.getDaemonParameters().isEnabled()) {
return Actions.toAction(runBuildWithDaemon(parameters.getStartParameter(), parameters.getDaemonParameters()));
}
//尝试在当前进程开启gradle
if (canUseCurrentProcess(parameters.getDaemonParameters())) {
return Actions.toAction(runBuildInProcess(parameters.getStartParameter(), parameters.getDaemonParameters()));
}
//开启daemon并进行一次执行,然后kill
return Actions.toAction(runBuildInSingleUseDaemon(parameters.getStartParameter(), parameters.getDaemonParameters()));
}

Actions

默认会运行,daemon进程

1
Actions.toAction(runBuildWithDaemon(parameters.getStartParameter(), parameters.getDaemonParameters()));

toAction会创建一个RunnableActionAdapter

1
2
3
4
5
6
7
8
public static <T> Action<T> toAction(@Nullable Runnable runnable) {
//TODO SF this method accepts Closure instance as parameter but does not work correctly for it
if (runnable == null) {
return Actions.doNothing();
} else {
return new RunnableActionAdapter<T>(runnable);
}
}

你看着“像不像”一个适配器

1
2
3
4
5
6
7
8
9
10
11
12
13
14
15
16
17
private static class RunnableActionAdapter<T> implements Action<T> {
private final Runnable runnable;

private RunnableActionAdapter(Runnable runnable) {
this.runnable = runnable;
}

@Override
public void execute(T t) {
runnable.run();
}

@Override
public String toString() {
return "RunnableActionAdapter{runnable=" + runnable + "}";
}
}

RunBuildAction

本质上是一个Runnable

1
public class RunBuildAction implements Runnable

构造

1
2
3
4
5
6
7
8
// Create a client that will match based on the daemon startup parameters.
// 创建service
ServiceRegistry clientSharedServices = createGlobalClientServices(true);
ServiceRegistry clientServices = clientSharedServices.get(DaemonClientFactory.class).createBuildClientServices(loggingServices.get(OutputEventListener.class), daemonParameters, System.in);
//获取DaemonClient
DaemonClient client = clientServices.get(DaemonClient.class);
//创建runnable
return runBuildAndCloseServices(startParameter, daemonParameters, client, clientSharedServices, clientServices);
1
2
3
4
5
6
7
8
private Runnable runBuildAndCloseServices(StartParameterInternal startParameter, DaemonParameters daemonParameters, BuildActionExecuter<BuildActionParameters, BuildRequestContext> executer, ServiceRegistry sharedServices, Object... stopBeforeSharedServices) {
//创建参数
BuildActionParameters parameters = createBuildActionParameters(startParameter, daemonParameters);
//创建关闭的方法
Stoppable stoppable = new CompositeStoppable().add(stopBeforeSharedServices).add(sharedServices);
//直接new,注意executer是DaemonClient
return new RunBuildAction(executer, startParameter, clientMetaData(), getBuildStartTime(), parameters, sharedServices, stoppable);
}

run

1
2
3
4
5
6
7
8
9
10
11
12
13
14
15
16
17
18
19
20
21
public void run() {
try {
//DaemonClient.execute
BuildActionResult result = executer.execute(
new ExecuteBuildAction(startParameter),
buildActionParameters,
new DefaultBuildRequestContext(new DefaultBuildRequestMetaData(clientMetaData, startTime, sharedServices.get(ConsoleDetector.class).isConsoleInput()), new DefaultBuildCancellationToken(), new NoOpBuildEventConsumer())
);
//拿最后的执行结果
//异常处理
if (result.hasFailure()) {
// Don't need to unpack the serialized failure. It will already have been reported and is not used by anything downstream of this action.
throw new ReportedException();
}
} finally {
//关闭服务
if (stoppable != null) {
stoppable.stop();
}
}
}

DaemonClient

连接

逻辑如下

  1. 尝试与server连接

  2. 连接上了就直接尝试向daemon发生构建请求,中途出现重回第一步

  3. 没连接上就开启一个daemon,再发送构建请求,中途异常直接抛出。

1
2
3
4
5
6
7
8
9
10
11
12
13
14
15
16
17
18
19
20
21
22
23
24
25
26
27
28
29
30
31
32
33
34
35
36
37
38
39
40
41
42
43
44
45
46
47
48
49
50
public BuildActionResult execute(BuildAction action, BuildActionParameters parameters, BuildRequestContext requestContext) {
//生成uid
UUID buildId = idGenerator.generateId();
List<DaemonInitialConnectException> accumulatedExceptions = Lists.newArrayList();

LOGGER.debug("Executing build {} in daemon client {pid={}}", buildId, processEnvironment.maybeGetPid());
// 尝试最多尝试连接99次
// Attempt to connect to an existing idle and compatible daemon
int saneNumberOfAttempts = 100; //is it sane enough?
for (int i = 1; i < saneNumberOfAttempts; i++) {
//连接server
final DaemonClientConnection connection = connector.connect(compatibilitySpec);
// No existing, compatible daemon is available to try
// 连接不上说明client和server不兼容,退出。
if (connection == null) {
break;
}
// Compatible daemon was found, try it
// 连接上了直接构建一个bean
try {
Build build = new Build(buildId, connection.getDaemon().getToken(), action, requestContext.getClient(), requestContext.getStartTime(), requestContext.isInteractive(), parameters);
//执行构建
return executeBuild(build, connection, requestContext.getCancellationToken(), requestContext.getEventConsumer());
} catch (DaemonInitialConnectException e) {
// this exception means that we want to try again.
LOGGER.debug("{}, Trying a different daemon...", e.getMessage());
accumulatedExceptions.add(e);
} finally {
connection.stop();
}
}

// No existing daemon was usable, so start a new one and try it once
// 没有连接上,创建一个daemon
final DaemonClientConnection connection = connector.startDaemon(compatibilitySpec);
try {
// 构建一个build
Build build = new Build(buildId, connection.getDaemon().getToken(), action, requestContext.getClient(), requestContext.getStartTime(), requestContext.isInteractive(), parameters);
// 运行构建
return executeBuild(build, connection, requestContext.getCancellationToken(), requestContext.getEventConsumer());
} catch (DaemonInitialConnectException e) {
// This means we could not connect to the daemon we just started. fail and don't try again
throw new NoUsableDaemonFoundException("A new daemon was started but could not be connected to: " +
"pid=" + connection.getDaemon() + ", address= " + connection.getDaemon().getAddress() + ". " +
Documentation.userManual("troubleshooting", "network_connection").consultDocumentationMessage(),
accumulatedExceptions);
} finally {
connection.stop();
}
}

流程图如下:

connet-to-daemon.drawio

构建

DaemonClient.executeBuild

1
2
3
4
5
6
7
8
9
10
11
12
13
14
15
16
17
18
19
20
21
22
23
24
25
26
27
28
29
30
31
32
33
34
35
36
37
38
39
40
41
42
43
44
45
46
47
48
49
50
51
protected BuildActionResult executeBuild(Build build, DaemonClientConnection connection, BuildCancellationToken cancellationToken, BuildEventConsumer buildEventConsumer) throws DaemonInitialConnectException {
Object result;
try {
//日志
LOGGER.debug("Connected to daemon {}. Dispatching request {}.", connection.getDaemon(), build);
//发送构建请求
connection.dispatch(build);
//接受响应
result = connection.receive();
} catch (StaleDaemonAddressException e) {
LOGGER.debug("Connected to a stale daemon address.", e);
// We might fail hard here on the assumption that something weird happened to the daemon.
// However, since we haven't yet started running the build, we can recover by just trying again.
throw new DaemonInitialConnectException("Connected to a stale daemon address.", e);
}
// 首次响应异常响应异常异常
if (result == null) {
// If the response from the daemon is unintelligible, mark the daemon as unavailable so other
// clients won't try to communicate with it. We'll attempt to recovery by trying again.
connector.markDaemonAsUnavailable(connection.getDaemon());
throw new DaemonInitialConnectException("The first result from the daemon was empty. The daemon process may have died or a non-daemon process is reusing the same port.");
}

LOGGER.debug("Received result {} from daemon {} (build should be starting).", result, connection.getDaemon());

DaemonDiagnostics diagnostics = null;
//处理首次响应
if (result instanceof BuildStarted) {
diagnostics = ((BuildStarted) result).getDiagnostics();
// 实时监控build的情况
result = monitorBuild(build, diagnostics, connection, cancellationToken, buildEventConsumer);
}

LOGGER.debug("Received result {} from daemon {} (build should be done).", result, connection.getDaemon());
// 通知构建完成
connection.dispatch(new Finished());
// 异常结束。
if (result instanceof Failure) {
Throwable failure = ((Failure) result).getValue();
if (failure instanceof DaemonStoppedException && cancellationToken.isCancellationRequested()) {
return BuildActionResult.cancelled(new BuildCancelledException("Daemon was stopped to handle build cancel request.", failure));
}
throw UncheckedException.throwAsUncheckedException(failure);
} else if (result instanceof DaemonUnavailable) {
throw new DaemonInitialConnectException("The daemon we connected to was unavailable: " + ((DaemonUnavailable) result).getReason());
} else if (result instanceof Result) {
return (BuildActionResult) ((Result) result).getValue();
} else {
throw invalidResponse(result, build, diagnostics);
}
}

client构建监控

monitorBuild

1
2
3
4
5
6
7
8
9
10
11
12
13
14
15
16
17
18
19
20
21
22
23
24
25
26
27
28
29
30
31
private Object monitorBuild(Build build, DaemonDiagnostics diagnostics, Connection<Message> connection, BuildCancellationToken cancellationToken, BuildEventConsumer buildEventConsumer) {
DaemonClientInputForwarder inputForwarder = new DaemonClientInputForwarder(buildStandardInput, connection, executorFactory);
DaemonCancelForwarder cancelForwarder = new DaemonCancelForwarder(connection, cancellationToken);
try {
cancelForwarder.start();
inputForwarder.start();
int objectsReceived = 0;

while (true) {
// 接受消息
Message object = connection.receive();
objectsReceived++;
if (LOGGER.isTraceEnabled()) {
LOGGER.trace("Received object #{}, type: {}", objectsReceived++, object == null ? null : object.getClass().getName());
}
// 处理消息
if (object == null) {
return handleDaemonDisappearance(build, diagnostics);
} else if (object instanceof OutputMessage) {
outputEventListener.onOutput(((OutputMessage) object).getEvent());
} else if (object instanceof BuildEvent) {
buildEventConsumer.dispatch(((BuildEvent) object).getPayload());
} else {
return object;
}
}
} finally {
// Stop cancelling before sending end-of-input
CompositeStoppable.stoppable(cancelForwarder, inputForwarder).stop();
}
}

小结

Gradle Client的代码比较绕,但是总体来看,难度不大。

过程主要分为

bootstrap -> launcher -> client

  • bootstrap

    该阶段负责配置gradle的classpath,然后启动launcher

  • launcher

    配置所需环境并启动Client实体

  • client

    负责

    • 通过Connector与Daemon进行连接
    • 通过Connector向Daemon发送请求
    • 实时监听Daemon构建状态,并响应Gradle使用者(terminal输出)。

流程图如下:

gradle-client